 N-Hat
N-Hat
The Complete Raspberry Pi Start Up Guide
Follow these steps to quickly start up your Raspberry Pi.
1. Wire into the Raspberry
- Connect microUSB for power.
- Connect USB keyboard.
- Plug in the microSD (with OS already installed).
- Plug in HDMI to Display.
- (optional) Connect USB mouse.

2. Change the default password for the pi user.
-
Enter command
$ sudo raspi-config - Navigate to the Change User Password option.
- Follow the on-screen instructions to change the password for the pi user.
- This is probably one of the simplest things you can do. Many people leave the default password and when they expose the Raspberry Pi to the world, bad things happen.
3. Expand the filesystem to full capacity of the microSD.
-
Enter command
$ sudo raspi-config - Navigate to Advanced Options.
- Select Expand Filesystem.
- Follow the on-screen commands. You’ll be asked to reboot.
4. (optional) Enable ssh
-
Enter command
$ sudo raspi-config - Select Interfacing Options
- Navigate to and select SSH
- Choose “Yes” to enable ssh.
- Select “Ok”
- Choose “Finish”
5. (optional) Connect to Ethernet/Wifi
- Ethernet: easy, plug in an Ethernet cable to the Ethernet port.
- Wifi: add the network configuration to
wpa_supplicant.conf-
Enter command
$ sudo vi /etc/wpa_supplicant/wpa_supplicant.conf -
Add entry
network = { ssid="The_SSID" psk="Your_wifi_password" } -
Enter command
$ sudo wpa_cli reconfigure
-
6. (not optional if you activated ssh!!!) Secure SSH:
-
Edit file
$ sudo vi /etc/ssh/sshd_config - Do not allow root ssh (add/modify line to “PermitRootLogin no”)
- Limit user logins (add/modify line to “AllowUsers [username1] [username2] …”)
- Disable protocol 1 (Only have an entry for “Protocol 2”)
- (optional) change default port (add/modify line to “Port [some number]”)
- (optional) filter SSH at firewall a.k.a. only allow certain IP addresses to SSH
- Use public/private key for authentication
- Move public key over
- Now disable password authentication (“PasswordAuthentication no”)
-
Restart the ssh service
$ sudo service ssh restart - More info
![]()
4 Stages of IT Harmony

Typically at a larger company, the IT department may have strict processes and controls for their work. Usually, it involves submitting a ticket for something to be resolved.
I had to learn how to work within this system so that it became productive for me. However, I learned some things along the way that made it easier for both IT and myself.
I learned that there are 4 stages for IT Harmony. I’ll describe my evolution where I become more and more harmonic with IT.
Stage 1: Complete Idiot
The programmer is trapped in an endless world of trial-and-error. They are dependent on those around them and will turn to them at the first sign of distress.
“Help! I can’t ssh into the VM!”
IT Solution: “You had a typo in the hostname.” IT doesn’t even let you type. They take the keyboard, type in the correct hostname, then walk back to their desk to work on bigger ticket items.
Remedy: Stop being dumb. Double-check your inputs.
Stage 2: Ordinary
The programmer is now aware of their surroundings. The programmer yearns for truth yet is limited by their experience.
“Help! I checked everything and I can’t ssh into the VM!”
IT Solution: “VM is down for maintenance. You didn’t look at your email stating that However were scheduling the maintenance at this time?”
Remedy: Learn to use ping to double-check if the server is even reachable. You may even use curl or wget to check ports and responsiveness. And you read your emails.
Stage 3: Cloud-Enterer
The programmer has the basic foundations for being productive. They march ahead with their knowledge where they meet the boundaries of the corporate policies.
“Help! I can’t ssh into the VM! I ping’d it and it’s there!”
IT Solution: “Our firewall blocks that port. Please submit a ticket and a justification for approval to open the port. We’ll also need a list of hosts that can access it.”
Remedy: You learn the policies and the processes of the company. Most importantly, you learn how the tools of IT work.
You learn the basic firewall toolkits for your OS.
You learn DNS and BIND.
You learn TCP/IP Networking.
You learn Linux/UNIX/Windows + Network Administration.
Stage 4: Connected
The programmer is in harmony with IT. The programmer does not do IT’s job. The programmer simply is able to identify specifically their issues thereby reducing the searching, guessing, and troubleshooting required by IT. The programmer is regularly invited by IT to partake in evening festivaties.
“Help! I can’t ssh into the VM! I used nslookup and got nothing. I tried dig as well. It looks like the DNS entry never got made for the VM!”
IT Solution: “Ah, we were trying something new with Puppet. Thanks for letting us know, we’ll fix it real quick.”
Remedy: Programmer is at harmony.
Longest Repeated Consecutive Substring in Lisp
I wanted to document my journey figuring out how I solved a unique problem and how doing so in Lisp helped me find a concise and correct solution.
Twitch is a live streaming platform for gaming and Twitch chat, a group chat accompanying the live-streaming video, can become incomprehensible and unwieldy with large amounts of messages submitted rapidly. A streamer or a viewer paying attention to Twitch chat may miss messages as they are buried by the ocean of new incoming messages.
I noticed that the screen real estate is occupied by long messages and often repeated messages. So I tried to tackle that problem with compakt, a Chrome Extension for Twitch chat.
To compress long messages, I used suffix arrays and an adaptation to the classic longest repeated substring. Prototyping all this in Lisp really help me decide on a concise and accurate solution.
Suppose we had the following string: abracadabra. Suffixes are substrings that contain all characters from a position in the string to the end of the string. For the aforementioned string, all possible suffixes are:
- abracadabra$
- bracadabra$
- racadabra$
- acadabra$
- cadabra$
- adabra$
- dabra$
- abra$
- bra$
- ra$
- a$
’$’ denotes the end of the string. Typically a character that isn’t present originally in the string is used for this. A suffix array is an array that contains all the suffixes for a string in sorted order. Again for the aforementioned string, the suffix array is:
- a$
- abra$
- abracadabra$
- acadabra$
- adabra$
- bra$
- bracadabra$
- cadabra$
- dabra$
- ra$
- racadabra$
We take advantage of this sorted property to find the longest repeated substring!
In the example above, we explicitly list out every suffix for demonstration-sake. But we can use a more compact representation of the suffix array. Instead of the suffixes themselves, we use the position of the start of the suffix (0-based index). Because suffixes are substrings from a position to the end of the string, the position can be used to uniquely identify a suffix. The suffix array from above then becomes:
- 10
- 7
- 0
- 3
- 5
- 8
- 1
- 4
- 6
- 9
- 2
Suffix array construction takes \(O(n^{2} \log (n))\) time: sorting the suffixes is \(O(n \log (n))\) and each suffix comparison is \(O(n)\). A suffix array takes \(O(n)\) space.
Note
There are algorithms that can construct the suffix array in \(O(n)\) time though the implementation I present here will not be one of those.
Sources:
1 2 3 4 5 6Note
You may have heard of suffix trees. Often, these are presented before suffix arrays in literature. I went with a suffix array because it was easier so me to understand.
The longest repeated substring is a well-document problem. What follows is a description of the problem and how it’s solved with suffix arrays. Then I’ll describe the steps I take to adapt it to my problem: the longest repeated consecutive substring.
Longer repeated substrings are more likely to occur between lexicographically consecutive suffixes.
What I want to do first is establish an intuition for determining the longest repeated substring from a suffix array. Suppose we simply wanted to find an occurrence of a pattern in the string abracadabra. Let this pattern be bra. What we would do is a binary search on the suffix array. If the pattern exists in the string it is equal to a suffix or a substring of a suffix, also known as a prefix. Knowing this, how do we find an arbitrary substring that repeats in the string? We compare suffixes to each other! A repeated substring would appear in at least 2 different suffixes. In other words, the repeated substring should appear in at least 2 different places of the string. And knowing that the suffix array is sorted, we don't need a \(O(n^2)\) comparison i.e. comparing one suffix to rest to find the repeated substring. Longer repeated substrings are more likely to occur between lexicographically consecutive suffixes. So we look for the longest common prefix between all pairs of consecutive suffixes.
Finding the longest repeated substring is a simple matter of retaining a best-so-far match and comparing the length of new potential matches.
(defun lcp (a b)
  (let ((i (string< a b)))
    (subseq a 0 i))
)

(defun returnLonger (a b)
  (if (> (length a) (length b))
    a
    b
  )
)

(defun findLongestCommonSubstring (suffixarr str best)
  (let ((best (returnLonger
                (lcp (subseq str (first suffixarr)) (subseq str (second suffixarr)))
                best)))
    (if (<= (list-length suffixarr) 2)
      best
      (findLongestCommonSubstring (rest suffixarr) str best)))
)

(defun _range (count i l)
    (if (<= count 0)
        l
        (_range (1- count) (1+ i) (append l (list i))))
)

(defun range (count)
    (_range count 0 ())
)

(let ((s (read-line)))
  (let ((suffixarray (sort (range (length s)) #'(lambda (x y) (string< x y)) :key #'(lambda (i) (subseq s i)))))
    (let ((lrcs (findLongestCommonSubstring suffixarray s "")))
      (print lrcs))))
We benefit from iterating through the suffix array in \(O(n)\). But since we compare each character of the string, the algorithm is \(O(n^{2})\).
We have a strong foundation for what we want to do. However, it’s not perfect. Take this for example:
ATCGATCGA$
The longest repeated substring is ATCGA. This repeated substring overlaps with itself. We would like to find a repeated substring that doesn’t overlap and is consecutive.
Non-overlapping but also not consecutive:
ABBAissocoolIloveyouABBA\$
Repeated string ABBA occurs but not sequentially.
Non-overlapping and consecutive:
yoloyoloyolobaggins\$
Repeated string yolo is repeated multiple times and is non-overlapping and consecutive.
So how do we do this?
Finding the repeated consecutive substrings is simple: the repeated substring must be the same distance as the distance between 2 suffixes. So for every longest common prefix that we find, check if its length is equal to the distance between the 2 suffixes. If so, it is repeated, non-overlapping and consecutive.
(defun lcp (a b)
  (let ((i (string< a b)))
    (subseq a 0 i))
)

(defun updatelcp (oldlcp checklcp suffix1 suffix2)
  (if (and (> (length checklcp) (length oldlcp))
           (checkConsecutive checklcp suffix1 suffix2))
    checklcp
    oldlcp
  )
)

(defun checkConsecutive (lcp suffix1 suffix2)
  (= (length lcp) (abs (- suffix1 suffix2)))
)

(defun findLongestCommonSubstring (suffixarr str best)
  (let ((best (updatelcp
                best
                (lcp (subseq str (first suffixarr)) (subseq str (second suffixarr)))
                (first suffixarr)
                (second suffixarr))))
    (if (<= (list-length suffixarr) 2)
      best
      (findLongestCommonSubstring (rest suffixarr) str best)))
)

(defun _range (count i l)
    (if (<= count 0)
        l
        (_range (1- count) (1+ i) (append l (list i))))
)

(defun range (count)
    (_range count 0 ())
)

(let ((s (read-line)))
  (let ((suffixarray (sort (range (length s)) #'(lambda (x y) (string< x y)) :key #'(lambda (i) (subseq s i)))))
    (let ((lrcs (findLongestCommonSubstring suffixarray s "")))
      (print lrcs))))
Before I explain how Lisp helped me understand this logic, I want to quickly describe one other extension I made for my application.
I only wanted to find repeated substrings that consisted of whole words from the original message. So I tokenized the original string and treated each token as a character. Then I performed the longest repeated consecutive substring on this new structure. You can give the code here on my GitHub.
I love Lisp
In my head, I imagined this section as a list of features that I would ramble on about how they helped me implementation this algorithm. But I think I only need to say one thing: functional programming.
- I was forced to take advantage of the existing structures and their properties instead of iterators and counts making for an efficient use of my allocated memory.
- I was able to see the meat and bones of the algorithm: a lcp search between each pair of lexicographically consecutive suffixes.
I’m still very new to Lisp but I know for sure I want to dive deeper into functional programming. I’m happy to hear any feedback on this post or the code in this post. Check out the Lisp code for my application here. And please check out my extension! It’s open-sourced!
How to Build a Chrome Extension for Twitch Chat

Customize and extend Twitch Chat!
People have strong opinions about Twitch Chat. Despite what one may think, it’s one of the most integral parts of Twitch.
Do you ever have an idea for customizing or improving Twitch Chat? You can do so with Chrome Extensions. Many popular Twitch “must-haves” are browser extensions like the popular BetterTTV. I’ve made my own extension and I’ll teach you how to make one yourself by presenting a basic extension. Specifically, I’ll show you how to retrieve chat messages so that you’ll be able to do cool stuff with it.
We’ll make an extension that finds any utterance of the word “bard” and replaces it
with a picture of a bard:  .
.
Requirements
- Chrome Browser (I hope to have more posts on Firefox, Safari, etc.)
- some Javascript knowledge
Chrome Extension Basics
(just the bare minimal!)
A Chrome extension is just that: it extends the functionality of the Chrome browser. An extension usually consists of the following files:
- manifest
- Javascript [background or injected]
A manifest file is a JSON that describes the extension.
Then there are the Javascript files. Background Javascript files are run as long as the browser is running and the extension is activated. These files are not loaded with a visited webpage’s resources. For example, ad blockers operate with background Javascript files by blocking ads from being loaded in your page. Unlike background Javascript files, injected Javascript files are “injected” into every page a.k.a. it’s loaded along with the webpage’s resources.
Let’s make the manifest file first.
Manifest Destiny
I’m just going to dump the manifest file on you and then explain the important parts. Check out the Chrome Extension manifest resource for info on all fields.
{
  "manifest_version": 2,

  "name": "Bard",
  "short_name": "Bard",
  "description": "Search the land far and wide for the bard.",
  "version": "0.01",
  "background": {
    "scripts": ["checkIfTwitch.js"],
    "persistent": false
  },
  "page_action": {
    "default_title": "twitch_bard"
  },
  "content_scripts": [
    {
      "matches": ["https://www.twitch.tv/*"],
      "js": [
        "jquery-3.1.1.slim.min.js",
        "main.js"
      ],
      "exclude_globs": ["https://www.twitch.tv/directory/*",
        "https://www.twitch.tv/p/*",
        "https://www.twitch.tv/products/*",
        "https://www.twitch.tv/*/manager*",
        "https://www.twitch.tv/*/dashboard",
        "https://www.twitch.tv/broadcast",
        "https://www.twitch.tv/messages/*",
        "https://www.twitch.tv/settings"
      ],
      "run_at": "document_end"
    }
  ],
  "web_accessible_resources": [
    "assets/bard.png"
  ],
  "permissions": [
    "activeTab"
  ]
}
The most important parts of this file are:
- background: Lists in an array all JavaScript files that are background scripts
- content_scripts: Lists all JavaScript files that are injected. Order matters! We load jquery first because the other script will reference it!
- exclude_globs: URLs where the extension won’t run_at
- web_accessible_resources: Resources in the extension that the browser may have access to and load. We specify our bard picture right there.
- run_at: When the injection of JavaScript is done
Meat and Bones
Diving into the code!
In the manifest file, devs can determine when the extension is loaded. This affects what the extension can act on in the DOM. For Twitch, it’s a little tricky. Notice that for run_at, we want to inject our scripts when the document, the webpage, has loaded. However, Twitch’s UI is dynamic. So the document may be done loaded but Twitch chat isn’t up yet. We need to be able to scan elements being added to the page to identify Twitch chat. To do this, we used MutationObserver.
MutationObservers are ridiculously useful. Simply put, they are objects that can react to DOM changes. We use them to look for Twitch chat.
var config = {attributes: false, childList: true, characterData: false};

var htmlBody = $("body")[0];
var chatLoadedObserver = new MutationObserver(function (mutations, observer) {
    mutations.forEach(function (mutation) {
        var chatSelector = $(".chat-lines");
        if (chatSelector.length > 0) {
            // Select the node element.
            var target = chatSelector[0];

            // Pass in the target node, as well as the observer options
            bardFinder.observe(target, config);

            // Unregister chatLoadedObserver. We don't need to check for the chat element anymore.
            observer.disconnect();
        }
    })
});

chatLoadedObserver.observe(htmlBody, config);
Let’s go one chunk at a time.
var config = {attributes: false, childList: true, characterData: false};
We specify the configurations for the MutationObserver. Using childList: true,
we only want to know changes consisting of nodes being added to the element we observe.
We don’t care if its attributes change, attributes: false, or if its data changes, characterData: false.
More info on config.
var htmlBody = $("body")[0];
We use jquery to select the body HTML element that we know must be already in the document.
var chatLoadedObserver = new MutationObserver(function (mutations, observer) {...}
We create a new MutationObserver and define what it should do for every DOM change event…
mutations.forEach(function (mutation) {
  var chatSelector = $(".chat-lines");
  if (chatSelector.length > 0) {
    // We found Chat!
  }
For everything change, we select the element, if any, with the class .chat-lines.
That’s our Twitch chat! We can double-check this by inspecting in the browser.
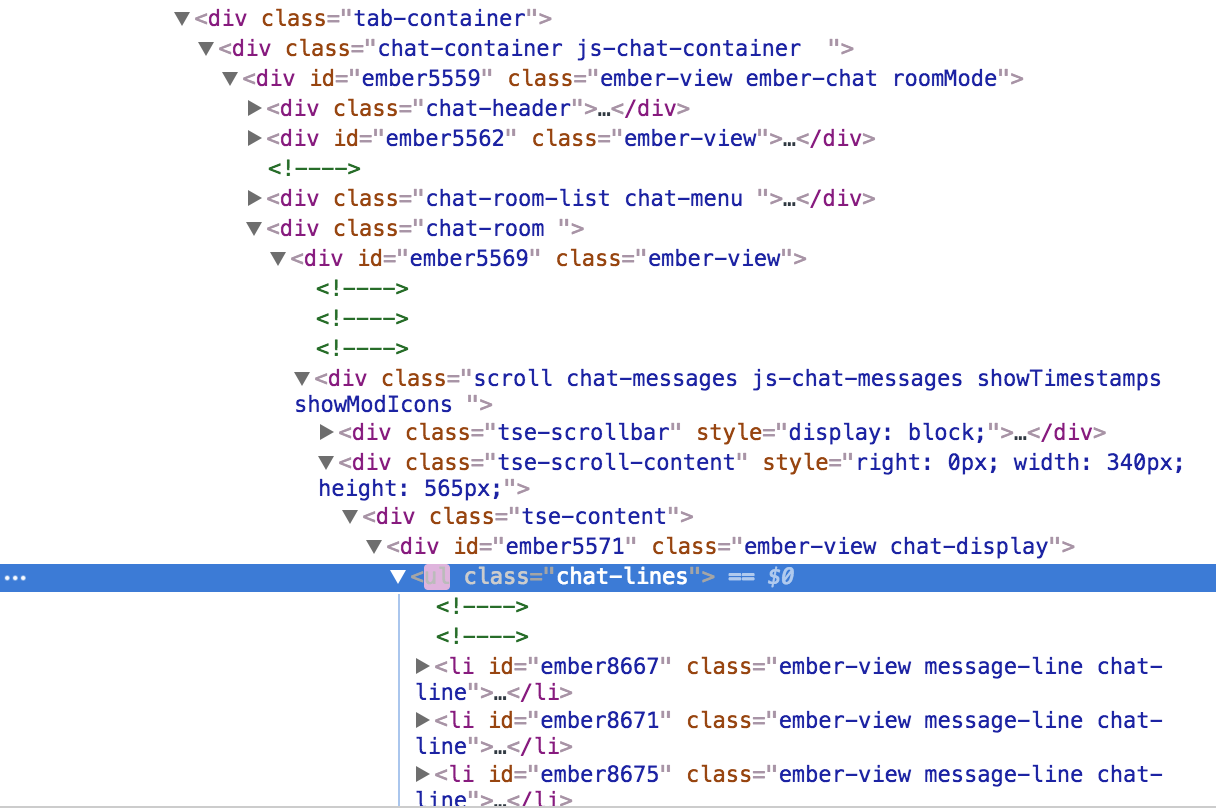
In the future, Twitch decides to change the class name for Twitch chat, we’ll have to update our code.
observer.disconnect();
I skipped a few lines and I just want to explain this quickly. We disconnect the observer once we find chat. We no longer need to send it events because we found what we are looking for.
bardFinder.observe(target, config);
So what is a bard finder?
// Bard Search
// Attach listener that acts when a new chat message appears.
var bardFinder = new MutationObserver(function (mutations) {
  // For each mutation object, we look for the addedNode object
  mutations.forEach(function (mutation) {
    // A chat message would be an added node
    mutation.addedNodes.forEach(function (addedNode) {
      // At this point it's potentially a chatMessage object.
      var chatMessage = $(addedNode);
      if (!chatMessage.is(".chat-line", ".message-line")) {
        // this isn't a chat message, skip processing.
        return;
      }
      // Grab the actual span element with the message content
      var messageElement = chatMessage.children(twitchChatMessageContent);

      parseMsgHTML(messageElement);
    });
  });
});
bardFinder is another MutationObserver! Once we find the chat, we must observe each
chat message. MutationObserver allows us to do that because chat messages are simply
nodes being added to the parent node, the .chat-lines node!
mutations.forEach(function (mutation) {
  // A chat message would be an added node
  mutation.addedNodes.forEach(function (addedNode) {
    // At this point it's potentially a chatMessage object.
    var chatMessage = $(addedNode);
    if (!chatMessage.is(".chat-line", ".message-line")) {
      // this isn't a chat message, skip processing.
      return;
    }
For each added node, we check the class to see if they are chat messages.
// Grab the actual span element with the message content
var messageElement = chatMessage.children(.message);

parseMsgHTML(messageElement);
Then we find one, we retrieve the body of the text.
Finally, before going into the nitty gritty, we start the observer to listen for events.
chatLoadedObserver.observe(htmlBody, config);
Parsing the Chat message
Here is where we do our bard magic!
Looking at the parsing code will be straight-forward if you’re familiar with JavaScript. This part has the least to do with Twitch or Chrome extensions.
// Twitch chat message element: rich with media.
var parseMsgHTML = function (msgHTML) {
  var contents = msgHTML.html(
    msgHTML
      .text()
      .replace(
        "bard",
        "<img src='"+ chrome.extension.getURL('assets/bard.png') + "' alt='bard!'/>")
  );
};
This function receives an jquery HTML element. We use msgHTML.html(...) to set new HTML for the element.
(don’t use .text() because it will interpret the new part as text, not HTML!).
Within there, we get the text of the HTML, msgHTML.text() and we replace any instance
of the sequence “bard” with an HTML element.
This part is important:
chrome.extension.getURL('assets/bard.png')
We must use chrome.extesion.getURL when we are referencing a file in our extension package
because the API will create the appropriate path for us.
Load the extension
I won’t go over how to load the extension in Chrome because Google will do a better job than me.
How to load an extension into Chrome.
This is obviously for development sake. You can of course upload it to the Chrome Web store.
That’s it!
Further Work
I hope you found that useful. I wanted to share some of the tricky bits such as identifying the appropriate elements of chat and how to get to them.
The skeleton extension can be found here on GitHub.
With this model, you can do a lot of things. You can parse chat and do really cool summaries, add your own emotes or wrangle the beast!
Please leave me any feedback and checkout my Chrome extension for Twitch: compakt. It compresses long messages and condenses repeated messages.
A Practical Walkthrough about Bandits for Trauma Response
Assessing the best EMT response using Bandit Algorithms
A controversial experiment is being performed in Philadelphia. Researchers are exploring the appropriate response for a gunshot or stab victim: whether the victim receives advanced care at the scene or if they receive only basic care before being transported to a nearby hospital. Dr. Zoe Maher, trauma surgeon, mother, and a researcher conducting this study, asserts that it is better for victims to receive basic care until they reach the hospital. Her colleagues and she believe that advanced care, such as IV fluids and breathing tubes, will disrupt the body’s natural measures of preventing blood like the constriction of blood vessels and the forming of clots.
Most of the controversy from this study, at least from what the article describes, is due to how the study is conducted. Depending on the dispatch number of the city paramedics…
- odd numbers will carry out advanced care
- even numbers will provide basic care
Just focusing on appearances, the words “advanced” and “basic” imply that half of the future stab and gunshot victims in Philadelphia will just randomly get sub-bar care (because “advanced” is better than “basic”, right?). It’s reasonable to see how the population may be worried.
I want to do a basic intro to bandit algorithms and why they’re better for this type of experiment. Then I want to motivate contextual bandits as the further improved approach.
This post is a practical walkthrough of a previous post.
Creating some data
I looked everywhere for data to use in the project. I would imagine between patient information and the difficulty of collecting data in an emergency medical situation, this data is not readily available. So let’s make up some data that would most likely represent this scenario.
We’re going to create a class that outputs emergency events for us. It’s over-simplified. The probability of survivability is fixed and is dependent on the type of emergency and the treatment administered.
import random

emergency_type = ['stab', 'gunshot']

class SimpleEmergency:
    def __init__(self):
        self.emergency_type = random.choice(emergency_type)

    def apply_treatment(self, treatment):
        '''
        A very simplified model of the emergency and the outcome based on treatment.
        Outcome is treated as P(survive | (treatment, emergency_type))

        P( survive | (stab, basic)) = .6
        P( survive | (stab, advanced)) = .5
        P( survive | (gunshot, basic)) = .75
        P( survive | (gunshot, advanced)) = .45
        '''

        # If it was a stab wound and the basic treatment was applied.
        if (self.emergency_type == 'stab') and (treatment == 'basic'):
            if random.random() > .6:
                return True
            else:
                return False
        # If it was a stab wound and the advanced treatment was applied.
        elif (self.emergency_type == 'stab') and (treatment == 'advanced'):
            if random.random() > .5:
                return True
            else:
                return False
        # If it was a gunshot wound and the basic treatment was applied.
        elif (self.emergency_type == 'gunshot') and (treatment == 'basic'):
            if random.random() > .75:
                return True
            else:
                return False
        # If it was a gunshot wound and the advanced treatment was applied.
        elif (self.emergency_type == 'gunshot') and (treatment == 'advanced'):
            if random.random() > .45:
                return True
            else:
                return False
The Bandit
Now let’s jump right into the bandit! We’re going to be looking at one of the most popular bandit algorithms, the Upper Confidence Boundary (UCB) Bandit. Before we look at the code, let me give a description of the UCB bandit.
A bandit explores and exploits. That means according to its policy, when presented with a trial from the environment, the agent, our dearly beloved bandit, will choose whether to try action and assess the received reward (explore) or it will choose the action that has been the most beneficial (exploit). You can generalize that bandits differ essentially by this policy for exploration vs. exploitation. The UCB bandit’s policy will always choose the best arm that has historically given it the most reward BUT it will try different arms if it hasn’t tried them in a while.
“How the hell does that work?”
Well the UCB defines a function as follows:
action.value + sqrt((2 * log(total_counts)) / float(action.count))
^              ^
|__ term 1     |______ term 2

- total_counts : number of times the bandit was faced with a decision and chose an arm.
- arm.count    : number of times this action has been chosen.
- arm.value    : historical average for reward received for this action.
Term 1
action.value
As described above, term 1 is the historical average for the reward of this particular action.
Term 2
sqrt((2 * log(total_counts)) / float(action.count))
But term 2 does all the magic for exploration. Term 2 is a large number when total_counts is large and action.count is small. Interpreted, that means term 2 is large when a long period of time has passed without trying the action.
But there’s more to it!
All together now
Together, term 1 and term 2 create a value used by the bandit to choose which action to try. The bandit will always choose the action with the highest value. An action could have a low, historical reward (term 1) but if it’s been long enough for term 2 to be large, the bandit will try that action. This has the very cool effect of trying poorer performing arms less!
The UCB bandit will try poorer performing arms in the future. Is this a good thing or a bad thing. It depends on the environment. If this is a static environment, meaning there is an absolute best action for the bandit, then this is not an ideal feature of UCB. It will all try poorer performing arms though more infrequently as time progresses. If the environment is dynamic and the best decisions change over time, then this is a good feature. The bandit may try different arms and notice that the rewards are different. This in turn changes how it decides which arm to pick in the future.
So finally, let’s look at the entire code for the UCB bandit. Code from the great John Myles White (@johnmyleswhite) whose book is highly recommended (and from which this slightly-edited code excerpt comes from).
import math

def ind_max(x):
  m = max(x)
  return x.index(m)

class UCB1():
  def __init__(self, n_arms):
    self.initialize(n_arms)
    return

  def initialize(self, n_arms):
    self.counts = [0 for col in range(n_arms)]
    self.values = [0.0 for col in range(n_arms)]
    return

  def select_arm(self):
    n_arms = len(self.counts)
    for arm in range(n_arms):
      if self.counts[arm] == 0:
        return arm

    ucb_values = [0.0 for arm in range(n_arms)]
    total_counts = sum(self.counts)
    for arm in range(n_arms):
      # IMPORTANT STUFF!
      bonus = math.sqrt((2 * math.log(total_counts)) / float(self.counts[arm]))
      ucb_values[arm] = self.values[arm] + bonus
    return ind_max(ucb_values)

  def update(self, chosen_arm, reward):
    self.counts[chosen_arm] = self.counts[chosen_arm] + 1
    n = self.counts[chosen_arm]

    value = self.values[chosen_arm]
    new_value = ((n - 1) / float(n)) * value + (1 / float(n)) * reward
    self.values[chosen_arm] = new_value
    return
Other Bandits
As mentioned earlier, there are other bandits. They differ mostly in how their policy dictates exploration vs. exploitation. Here are some:
- UCB2
- Epsilon-Greedy
- Epsilon-Greedy with Simulated Annealing
- EXP3
- Hedge
- Softmax
- Softmax with Simulated Annealing
Testing our Bandit
Let’s test our bandit! The simulation will run as follows:
def train_UCB1(trials, arm_labels):

    # Initialize bandit with the number of actions it can perform.
    bandit = UCB1(len(arm_labels))

    for _ in range(trials):
        # Create one emergency situation
        e = SimpleEmergency()

        # The bandit will select an action, an arm.
        action = bandit.select_arm()

        # See if the action, the treatment, is a success or not.
        success = e.apply_treatment(arm_labels[action])

        # If it's successful...
        if success:
            # We reward the action.
            bandit.update(action, 1.0)
        else:
            # We don't reward the action.
            bandit.update(action, 0.0)

    return bandit
Inspection
Let’s inspect our bandit to see how it decides.
trials = 1000
treatments = ['basic', 'advanced']

bandit = train_UCB1(trials, treatments)

for treatment, value in zip(treatments, bandit.values):
    print('{}: {}'.format(treatment, value))
basic: 0.3064516129032258
advanced: 0.5194063926940644
The larger number indicates the action that is best!
Note: this result has no meaning on the Philadelphia experiments. Why? Because our data is made up! In fact, you should play with the percentages to see how it changes the outcome!
Why Bandits though?
So we talked about bandits and how it can be used in this context. But why should we?
Consider how the Philadelphia experiment is set-up. It’s set-up much like how A/B testing sets up experiments: divide population in number of groups corresponding to the experimental parameters you would like to test. In this case, the population is divided in two, one for ‘basic’ treatment and the other for ‘advanced’ treatment.
Let’s make these differing approached face-off against one another! Let the most accurate win!
def bandit_vs_AB():

    trials = 1000
    treatments = ['basic', 'advanced']
    bandit = UCB1(len(treatments))
    bandit_score = 0
    AB_score = 0

    for i in range(trials):
        # Create one emergency situation
        e = SimpleEmergency()

        # Bandit
        action = bandit.select_arm()
        bandit_treatment = treatments[action]

        bandit_success = e.apply_treatment(bandit_treatment)
        if bandit_success:
            bandit.update(action, 1.0)
            bandit_score +=1
        else:
            bandit.update(action, 0.0)

        # A/B
        if (i % 2) == 0:
            AB_treatment = treatments[0]  # basic
        else:
            AB_treatment = treatments[1]  # advanced

        AB_success = e.apply_treatment(AB_treatment)
        if AB_success:
            AB_score += 1

    return bandit_score, AB_score
and the winner is…
for setup, score in zip(['bandit', 'A/B'], bandit_vs_AB()):
    print('{} : {}'.format(setup, score))
bandit : 470
A/B : 402
Bandits win!!!
How?
Bandit algorithms choose actions based on historical rewards per action. As it learns which action is the most fruitful, it chooses it more and more (I know I’m repeating myself at this point). This means we are able to benefit while learning about the experiment! So for Philadelphia, researchers can explore treatments early on in the experiment. But as time progresses, they start to get a sense of what works better and they start administering that action more and more.
Contextual Bandits
During the progression of the argument for bandits, I’m sure most of you thought, “this view is way too simplistic!”. You’re right. In real life, there is much more information available than just ‘gunshot’ or ‘stab’. In fact, some of you may have notice in the code that select_arm() doesn’t event take an argument (for you all-star, snake-charming Pythonistas out there, yes, there is actually an argument, self, but you know what I mean :) )! That’s the amazing thing about this bandits: it doesn’t need a model of the environment! It proceeds solely off of the action-rewards interaction. But we’re smart data scientists! We want to take advantage of all the information possibly available. Enter contextual bandits.
Up until this point, our bandit only decides one action that applies to both ‘stab’ and ‘gunshot’ scenarios. But as many of you could imagine, it could vary. Perhaps ‘basic’ treatment works better for one or the other. In fact there may be other factors at play. Emergencies should actually look like…
(note: at this point, the code is mainly to communicate my point. The fake data is starting to get really…fake).
regions = ['head', 'torso', 'arm/leg']

class RealEmergency:
    def __init__(self):
        self.emergency_type = random.choice(emergency_type)
        self.age = random.randint(18, 65)
        self.time_since_arrival = random.randint(60, 1080)  # seconds. Assume in Philly, all locations are within 18 min. of an ambulance
        self.location_of_injury = random.choose(regions)
        self.multiple_wounds = bool(random.randbits(1))
        self.time_to_hospital = random.randint(60, 1080)  # seconds. Refer to "time since arrival" assumption.
        # and possibly many others....

    def apply_treatment(self, treatment):
        # The following is used to mock a distribution of survivability over the parameters above.
        # IT IS NOT SCIENCE! It is only used for simulation!

        val = 0.0
        if self.emergency_type == 'stab':
            val = 3.42
        else:
            val = 9.6
        if random.betavariate(
            self.age/self.time_since_arrival + val,
            self.location_of_injury + self.multiple_wounds + self.time_to_hospital
        ) > .4:
            return True
        else:
            return False
Given all this new information, how should the bandit deal with it?
Well, when it decides which action to take, it should account for the context!
class ContextualBandit():
    def select_arm(self, context_vector):
        # map context_vector to some qualitative value per arm.
        # Let W_i be a 1-by-n vector where the context_vector is the column vector n-by-1.
        # i is the arm index

        arm_values = [0.0 for arm in range(self.n_arms)]
        for i in self.n_arms:
             arm_values[i] = W_i[i] * context_vector  + calc_exploration_value(i) # we can add another term like in UCB too!

        return ind_max(arm_values)

    def update(self, context_vector, arm, reward):
        # perform an update on the arm's historical reward.
        update_arm(arm, reward)

        # Update our W row-vector
        loss = compute_loss(context_vector, W_i[arm])
        update_W(W_i[arm], loss)
Notice that the bandit above basically wraps a linear regression model to map the context to a reward.
Remember, a bandit algorithm dictates a policy for exploration vs. exploitation. In a sense, bandit algorithms and reinforcement learning in general are just frameworks for learning. They are not disjoint from supervised and unsupervised learning.
There are other contextual bandits. And they can be extremely complex. This one is actually considered pretty naive for a contextual bandit. I just want to show you how you take advantage of the context of a decision.
Conclusion
Don’t forget about bandit algorithms. Canonical examples for applications of bandit algorithms are health/medical experiments such as the ones being conducted in Philadelphia.