 N-Hat
N-Hat
How to Build a Chrome Extension for Twitch Chat

Customize and extend Twitch Chat!
People have strong opinions about Twitch Chat. Despite what one may think, it’s one of the most integral parts of Twitch.
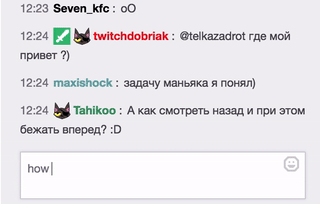
Do you ever have an idea for customizing or improving Twitch Chat? You can do so with Chrome Extensions. Many popular Twitch “must-haves” are browser extensions like the popular BetterTTV. I’ve made my own extension and I’ll teach you how to make one yourself by presenting a basic extension. Specifically, I’ll show you how to retrieve chat messages so that you’ll be able to do cool stuff with it.
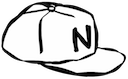
We’ll make an extension that finds any utterance of the word “bard” and replaces it
with a picture of a bard:  .
.
Requirements
- Chrome Browser (I hope to have more posts on Firefox, Safari, etc.)
- some Javascript knowledge
Chrome Extension Basics
(just the bare minimal!)
A Chrome extension is just that: it extends the functionality of the Chrome browser. An extension usually consists of the following files:
- manifest
- Javascript [background or injected]
A manifest file is a JSON that describes the extension.
Then there are the Javascript files. Background Javascript files are run as long as the browser is running and the extension is activated. These files are not loaded with a visited webpage’s resources. For example, ad blockers operate with background Javascript files by blocking ads from being loaded in your page. Unlike background Javascript files, injected Javascript files are “injected” into every page a.k.a. it’s loaded along with the webpage’s resources.
Let’s make the manifest file first.
Manifest Destiny
I’m just going to dump the manifest file on you and then explain the important parts. Check out the Chrome Extension manifest resource for info on all fields.
{
  "manifest_version": 2,

  "name": "Bard",
  "short_name": "Bard",
  "description": "Search the land far and wide for the bard.",
  "version": "0.01",
  "background": {
    "scripts": ["checkIfTwitch.js"],
    "persistent": false
  },
  "page_action": {
    "default_title": "twitch_bard"
  },
  "content_scripts": [
    {
      "matches": ["https://www.twitch.tv/*"],
      "js": [
        "jquery-3.1.1.slim.min.js",
        "main.js"
      ],
      "exclude_globs": ["https://www.twitch.tv/directory/*",
        "https://www.twitch.tv/p/*",
        "https://www.twitch.tv/products/*",
        "https://www.twitch.tv/*/manager*",
        "https://www.twitch.tv/*/dashboard",
        "https://www.twitch.tv/broadcast",
        "https://www.twitch.tv/messages/*",
        "https://www.twitch.tv/settings"
      ],
      "run_at": "document_end"
    }
  ],
  "web_accessible_resources": [
    "assets/bard.png"
  ],
  "permissions": [
    "activeTab"
  ]
}
The most important parts of this file are:
- background: Lists in an array all JavaScript files that are background scripts
- content_scripts: Lists all JavaScript files that are injected. Order matters! We load jquery first because the other script will reference it!
- exclude_globs: URLs where the extension won’t run_at
- web_accessible_resources: Resources in the extension that the browser may have access to and load. We specify our bard picture right there.
- run_at: When the injection of JavaScript is done
Meat and Bones
Diving into the code!
In the manifest file, devs can determine when the extension is loaded. This affects what the extension can act on in the DOM. For Twitch, it’s a little tricky. Notice that for run_at, we want to inject our scripts when the document, the webpage, has loaded. However, Twitch’s UI is dynamic. So the document may be done loaded but Twitch chat isn’t up yet. We need to be able to scan elements being added to the page to identify Twitch chat. To do this, we used MutationObserver.
MutationObservers are ridiculously useful. Simply put, they are objects that can react to DOM changes. We use them to look for Twitch chat.
var config = {attributes: false, childList: true, characterData: false};
var htmlBody = $("body")[0];
var chatLoadedObserver = new MutationObserver(function (mutations, observer) {
mutations.forEach(function (mutation) {
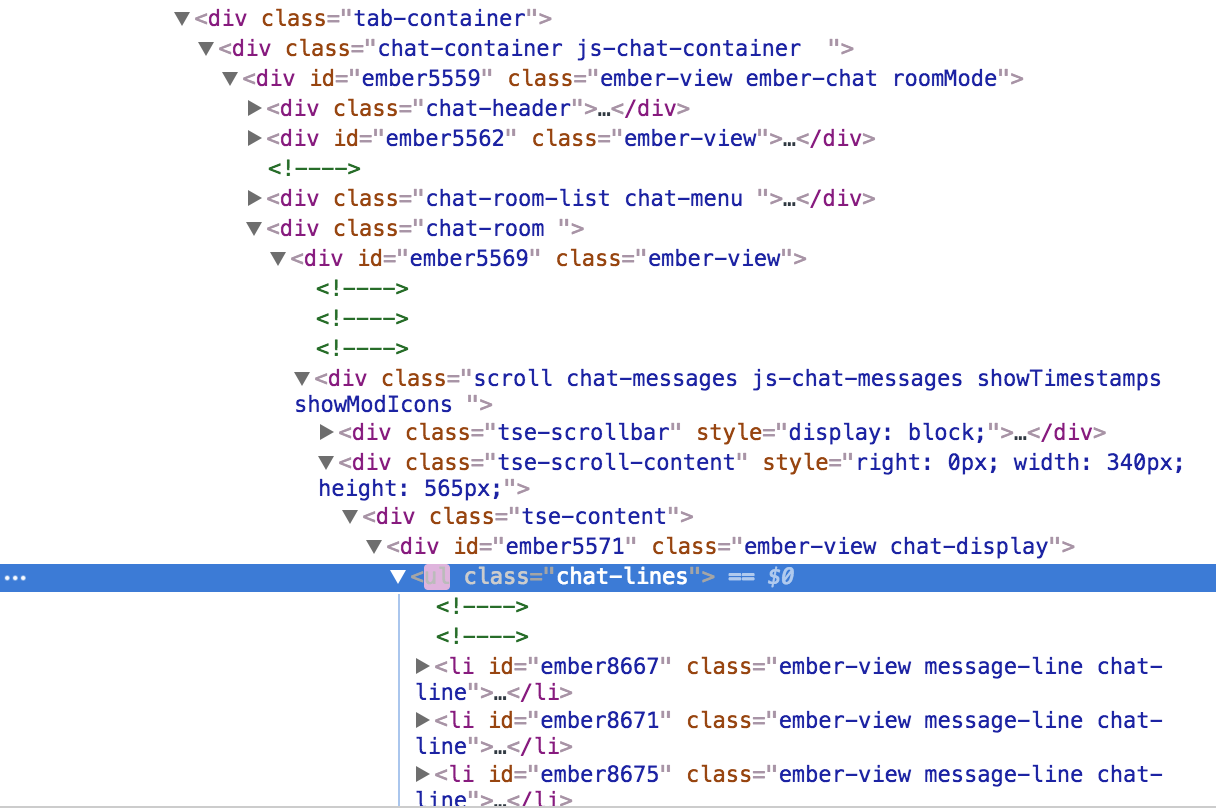
var chatSelector = $(".chat-lines");
if (chatSelector.length > 0) {
// Select the node element.
var target = chatSelector[0];
// Pass in the target node, as well as the observer options
bardFinder.observe(target, config);
// Unregister chatLoadedObserver. We don't need to check for the chat element anymore.
observer.disconnect();
}
})
});
chatLoadedObserver.observe(htmlBody, config);
Let’s go one chunk at a time.
var config = {attributes: false, childList: true, characterData: false};
We specify the configurations for the MutationObserver. Using childList: true,
we only want to know changes consisting of nodes being added to the element we observe.
We don’t care if its attributes change, attributes: false, or if its data changes, characterData: false.
More info on config.
var htmlBody = $("body")[0];
We use jquery to select the body HTML element that we know must be already in the document.
var chatLoadedObserver = new MutationObserver(function (mutations, observer) {...}
We create a new MutationObserver and define what it should do for every DOM change event…
mutations.forEach(function (mutation) {
  var chatSelector = $(".chat-lines");
  if (chatSelector.length > 0) {
    // We found Chat!
  }
For everything change, we select the element, if any, with the class .chat-lines.
That’s our Twitch chat! We can double-check this by inspecting in the browser.
In the future, Twitch decides to change the class name for Twitch chat, we’ll have to update our code.
observer.disconnect();
I skipped a few lines and I just want to explain this quickly. We disconnect the observer once we find chat. We no longer need to send it events because we found what we are looking for.
bardFinder.observe(target, config);
So what is a bard finder?
// Bard Search
// Attach listener that acts when a new chat message appears.
var bardFinder = new MutationObserver(function (mutations) {
  // For each mutation object, we look for the addedNode object
  mutations.forEach(function (mutation) {
    // A chat message would be an added node
    mutation.addedNodes.forEach(function (addedNode) {
      // At this point it's potentially a chatMessage object.
      var chatMessage = $(addedNode);
      if (!chatMessage.is(".chat-line", ".message-line")) {
        // this isn't a chat message, skip processing.
        return;
      }
      // Grab the actual span element with the message content
      var messageElement = chatMessage.children(twitchChatMessageContent);

      parseMsgHTML(messageElement);
    });
  });
});
bardFinder is another MutationObserver! Once we find the chat, we must observe each
chat message. MutationObserver allows us to do that because chat messages are simply
nodes being added to the parent node, the .chat-lines node!
mutations.forEach(function (mutation) {
  // A chat message would be an added node
  mutation.addedNodes.forEach(function (addedNode) {
    // At this point it's potentially a chatMessage object.
    var chatMessage = $(addedNode);
    if (!chatMessage.is(".chat-line", ".message-line")) {
      // this isn't a chat message, skip processing.
      return;
    }
For each added node, we check the class to see if they are chat messages.
// Grab the actual span element with the message content
var messageElement = chatMessage.children(.message);

parseMsgHTML(messageElement);
Then we find one, we retrieve the body of the text.
Finally, before going into the nitty gritty, we start the observer to listen for events.
chatLoadedObserver.observe(htmlBody, config);
Parsing the Chat message
Here is where we do our bard magic!
Looking at the parsing code will be straight-forward if you’re familiar with JavaScript. This part has the least to do with Twitch or Chrome extensions.
// Twitch chat message element: rich with media.
var parseMsgHTML = function (msgHTML) {
  var contents = msgHTML.html(
    msgHTML
      .text()
      .replace(
        "bard",
        "<img src='"+ chrome.extension.getURL('assets/bard.png') + "' alt='bard!'/>")
  );
};
This function receives an jquery HTML element. We use msgHTML.html(...) to set new HTML for the element.
(don’t use .text() because it will interpret the new part as text, not HTML!).
Within there, we get the text of the HTML, msgHTML.text() and we replace any instance
of the sequence “bard” with an HTML element.
This part is important:
chrome.extension.getURL('assets/bard.png')
We must use chrome.extesion.getURL when we are referencing a file in our extension package
because the API will create the appropriate path for us.
Load the extension
I won’t go over how to load the extension in Chrome because Google will do a better job than me.
How to load an extension into Chrome.
This is obviously for development sake. You can of course upload it to the Chrome Web store.
That’s it!
Further Work
I hope you found that useful. I wanted to share some of the tricky bits such as identifying the appropriate elements of chat and how to get to them.
The skeleton extension can be found here on GitHub.
With this model, you can do a lot of things. You can parse chat and do really cool summaries, add your own emotes or wrangle the beast!
Please leave me any feedback and checkout my Chrome extension for Twitch: compakt. It compresses long messages and condenses repeated messages.